Fall Facilities Checklist: When To Repair Vs. Replace Your Commercial Awning In Chicagoland

October 16, 2025

Chicago fall is beautiful, and it can be brutal. Gusty lakefront winds, sudden cold snaps, and constant freeze, thaw cycles can turn a small awning issue into a winter emergency. If you manage properties or oversee multiple sites, this is the right moment to decide whether your commercial awnings need repair, a fabric recover, or full replacement before temperatures drop

This guide walks you through what to look for, how to triage problems, realistic timelines, and budget ranges. You will finish with a clear plan to protect safety, curb appeal, and energy savings, without surprises when the first snow hits. 


Common Fall Failure Modes You Should Check 

Walk each site and document these red flags: 

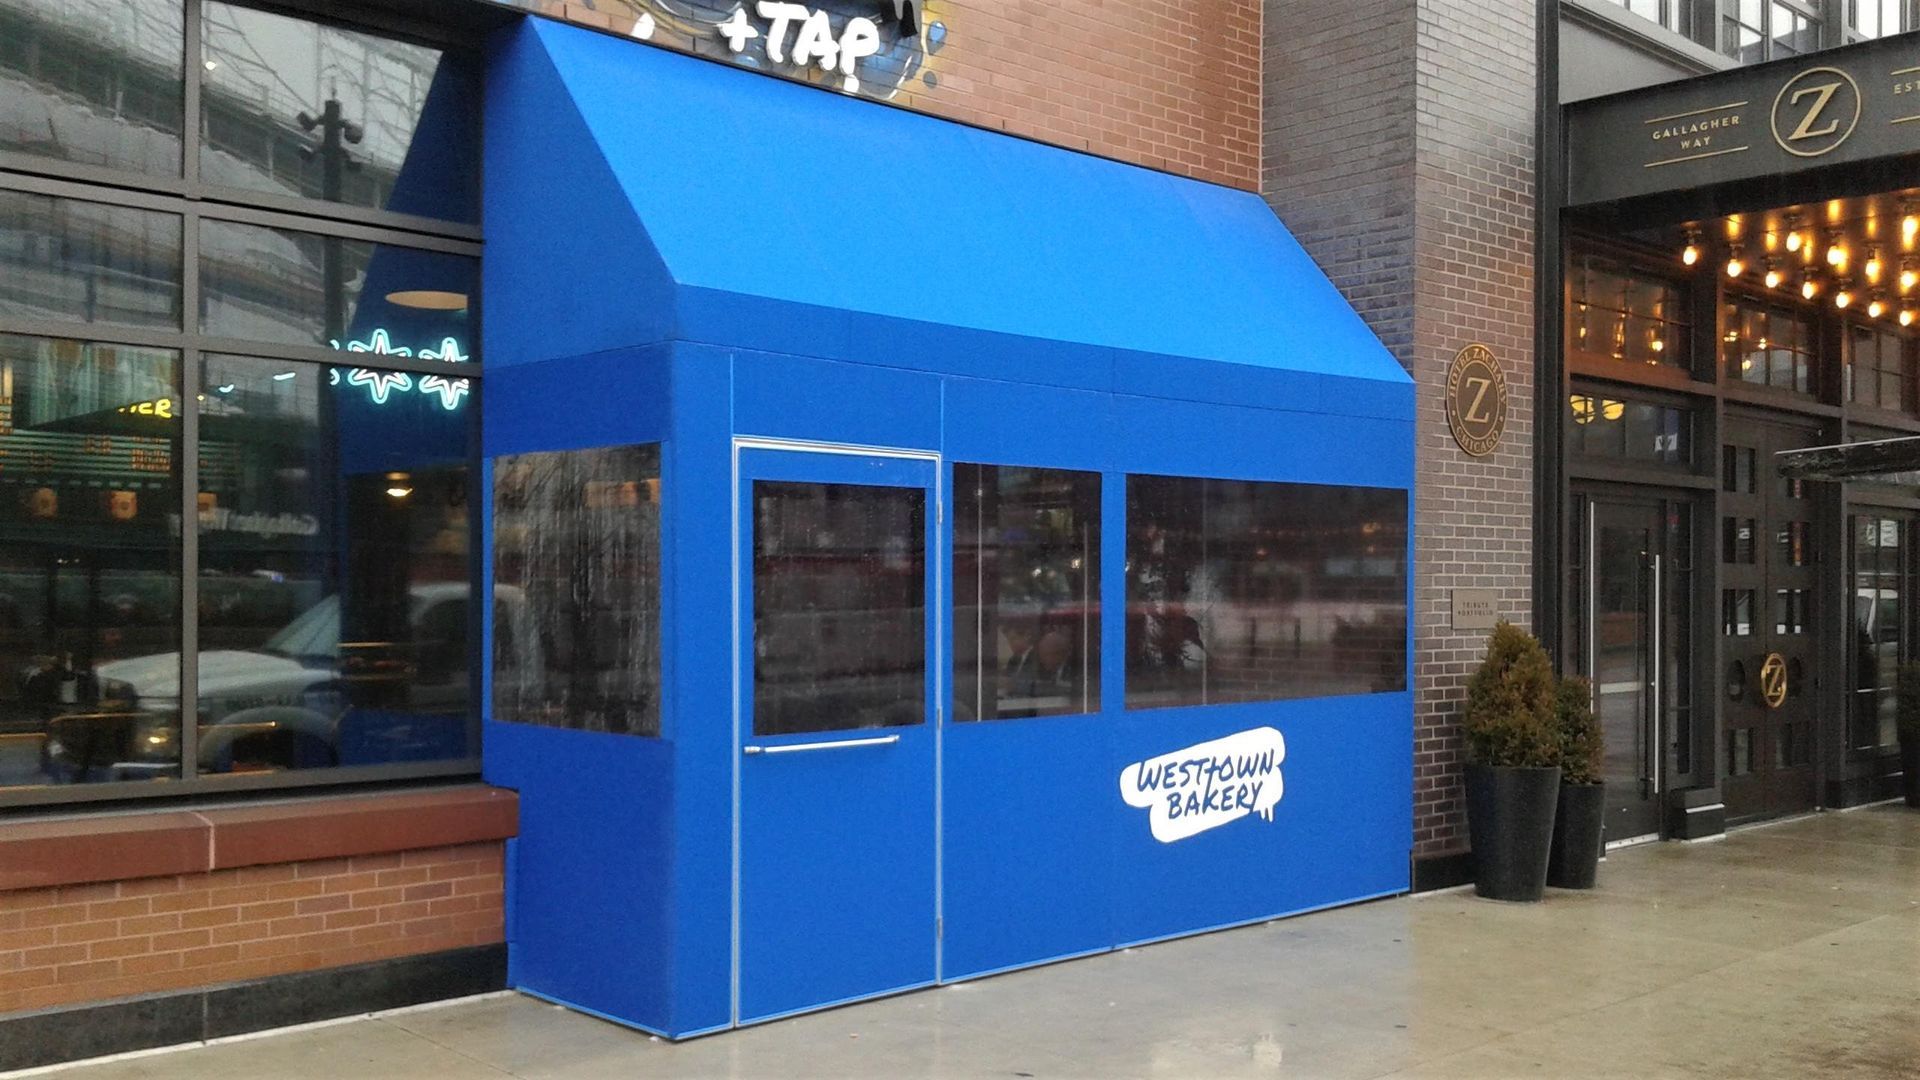
  • Fabric UV fatigue: Fading, cracking, pinholes, and chalking on vinyl or solution dyed acrylic. Sun-weakened fabric can tear during a windy snow event. 
  • Seam failure: Split threads, lifting hems, zippering at corners, or failing welded seams. Water intrusion leads to staining and icing along entrances. 
  • Bent or racked frames: Kicked by a truck mirror, overloaded by snow, or stressed by wind. Look for uneven lines, creaking, or a canopy that now sits out of square. 
  • Loose anchors or brackets: Hardware movement, rust streaks, or spalled masonry around fasteners. This is a safety issue first, a cosmetic issue second. 
  • Ponding and sagging: Water pockets after rain, deflection across long spans, or stretched fabric panels. 
  • Signage concerns: Cracked face panels, dim lighting, or graphics that no longer match your brand standards. 


Quick fixes help, but structural issues need decisive action before winter loads arrive. 


Can an awning be repaired? 

Yes, many can. Minor fabric tears, seam failures, loose valances, and isolated bracket issues are often repairable onsite. We typically recommend repair when: 

  • The frame is straight and sound. 
  • Fabric still has service life, but a seam or localized abrasion failed. 
  • Anchors are secure, and substrates are intact. 
  • The awning is newer, or you need a short term fix to get through winter. 


Choose repair for safety and water control first. Address appearance where it is cost effective. 


When a Recover Beats a Replacement 

A fabric recover installs new fabric skins over a solid frame. It is ideal when: 

  • The frame is straight, corrosion free, and properly anchored. 
  • You want fresh branding or new colors without the cost of new metal. 
  • You need a fast turnaround before the busy holiday season. 


In-house patterning and fabrication compress timelines because we measure, cut, and sew under one roof in Elmhurst. A recover saves money and reduces downtime while giving you like new curb appeal. 


When Full Replacement Is the Smarter Move 

Plan on full replacement when you see: 

  • Significant frame bending, racking, or metal fatigue. 
  • Widespread corrosion or cracked welds. 
  • Repeated anchor failures or damaged building substrates. 
  • Fabric that is brittle across large areas, not just at edges. 
  • Snow clearance or code changes that require a new design. 


Replacement also makes sense when you are upgrading to modern energy efficient shapes, adding integrated lighting, or moving to standing seam metal for four season durability. 


Cost Ranges You Can Use for Budgeting 

Actual pricing depends on size, projection, height, access, fabric selection, graphics, and structural demands. For planning purposes: 

  • Repair: Simple seam restitching, patching, reattachment of a bracket, or hardware replacement typically runs a few hundred dollars to low thousands per awning. Larger structural repairs with new brackets or welding can range from 1,500 to 4,000 per unit when access equipment is required. 
  • Recover: Re-skinning a typical storefront canopy often ranges from 1,800 to 6,500 per unit, including measurement, in-house fabrication, graphics, and installation. Large multi bay projects or complex shapes may run 7,000 to 15,000. 
  • Full replacement: New custom fabricated awnings, including engineered frames, new mounts, premium fabric, and installation, commonly range from 6,000 to 25,000 per unit. Larger canopies, walkway systems, or standing seam metal assemblies can exceed 30,000 depending on spans and snow loads. 

How much does it cost to repair an awning? Plan on several hundred to a few thousand for small to moderate issues.


How much does it cost to replace the fabric on an awning? A typical recover falls between 1,800 and 6,500 for most retail entries. How much does it cost to replace an awning? Full replacement starts around 6,000 and scales with size and structure. What is the average price for an awning? For a standard commercial entry, many projects land in the 7,500 to 12,000 range, while metal and long walkway systems can be higher. 


Service Life and Replacement Cadence 

How often do awnings need to be replaced? For well maintained fabric awnings in Chicagoland, expect: 

  • Fabric life expectancy: 8 to 12 years for quality solution dyed acrylic or vinyl, shorter on unprotected lakefront exposures or heavy soot corridors. 
  • Frame life expectancy: 15 years and up when properly engineered, finished, and maintained; standing seam metal systems often exceed 20 years. 


What is the life expectancy of an awning? With routine inspections, cleaning, and timely recover cycles, many frames deliver two fabric lives before replacement. 


A Fall Site Assessment That Prevents Downtime 

Use this checklist across your portfolio:

1. Photograph each awning from multiple angles. Note clearances to doors, sidewalks, and drive lanes. 

2. Inspect fabric for UV chalking, tears, seam lift, and ponding. 

3. Check frame alignment and look for cracked welds or corrosion at joints. 

4. Test anchors and substrates. Mark any movement, spalled brick, or loose hardware. 

5. Verify drainage and snow shedding paths. 

6. Confirm graphics and lighting match current brand standards. 

7. Prioritize high traffic entrances, ADA routes, and areas over vehicle lanes. 


A professional assessment catches issues early and sequences repairs or recovers in the right order. Our in-house team patterns, fabricates, and installs, which shortens lead times and locks in your schedule ahead of deep winter. 


Timelines and Permitting Notes 

  • Repairs: Often 2 to 10 business days depending on parts and access. 
  • Recovers: Typical 2 to 4 weeks from measure to install, faster for standard colors we stock. 
  • Replacements: 4 to 10 weeks, including engineering, fabrication, and coordination. 
  • Permits: Many municipalities require a sign or canopy permit for new structures, structural changes, or graphics. Lead time ranges from 1 to 4 weeks. We help with submittals, drawings, and snow load documentation typical for Chicago area jurisdictions. 


Proactive scheduling now prevents emergency closures after a wind event or heavy, wet snow. 


Local Options That Fit Chicago Weather 

If you are considering metal for year round performance, ask about four season profiles and snow rated designs that handle gusty corridor winds. We fabricate and install standing seam metal and engineered canopies that shed snow, resist icing at edges, and deliver long service life. 


You can also explore vestibule solutions for heat loss control at busy doors. If you want ideas for entrances, browse options like four-season awnings elmhurst to see how year round shade and protection can work at your sites. 


When to Repair, Recover, or Replace, A Quick Guide 

  • Repair now if the frame is solid, anchors are tight, and damage is localized. 
  • Recover if the frame is sound but fabrics are faded, brittle, or off brand. 
  • Replace when structure or anchoring is compromised, spans are under designed for snow, or you are upgrading to metal for durability. 


Summary and Next Steps 

Your fall window is short, but a focused walk through can save you money, improve safety, and protect curb appeal all winter. Repairs keep you operational, recovers refresh your brand quickly, and replacements future proof high exposure entrances. In-house fabrication and installation from our Elmhurst team streamlines your schedule, reduces risk, and keeps costs predictable. 


Ready for a clear plan? Schedule a fall assessment at our Elmhurst showroom or request an onsite inspection. If signage updates are part of your scope, our team also handles brand signage installations in elmhurst as part of a unified project. To discuss durable metal options for winter loads, see weatherproof metal awnings in elmhurst for inspiration and local support.

January 16, 2026
If you are planning a storefront or campus refresh this year, start at the entrance. A canopy or awning with integrated, illuminated branding can do three jobs at once, it protects guests from weather, guides people to the right door, and puts your name in lights for day and night visibility. When signage and shade structure are designed together, you get a cleaner facade, fewer wall penetrations, and a cohesive brand moment every time someone arrives. What counts as an illuminated sign? Illuminated signs are often called lighted signs, LED signs, backlit signs, or internally illuminated signs. You will also hear terms like channel letters, push thru letters, halo lit letters, and illuminated sign cabinets. Each describes how light is delivered through or around the graphics. Choosing the right type depends on your architecture, visibility goals, and energy use targets. Sign types that integrate well with canopies Internally illuminated cabinets: A box style sign with a rigid aluminum frame and an acrylic sign face that lights evenly from within. Great for logos with solid fills, multi tenant sites, or where you need maximum readability from a distance. Push thru letters: Acrylic letters or graphics are routed through an opaque aluminum face and stand proud of the surface. The result is crisp edges, bright letter faces, and a premium, dimensional look. Halo lit letters: Also called backlit letters, the light emits from behind the opaque letter, creating a soft glow around each character. Perfect when you want sophisticated nighttime presence with controlled brightness. Channel letters: Individual letter forms with integrated LEDs. These can be face lit, halo lit, or both. They mount to the canopy fascia or a raceway concealed within the canopy design. An internally illuminated sign uses LEDs mounted inside a cabinet or letter body to light the face or to create a halo effect. The light source is hidden, the effect is clean, and properly engineered LED layouts deliver even brightness without hot spots. What are illuminated signs made of? Most commercial illuminated signs use aluminum for structure, strength, and corrosion resistance. Faces are typically acrylic or polycarbonate for light transmission and impact resistance. Diffuser films, vinyl, or digitally printed graphics add color and opacity control. For canopy integration, we coordinate the sign housing with the canopy fascia, often powder coated aluminum, so sightlines and seams align. LEDs are the standard light source, they are efficient, low maintenance, and available in brand specific color temperatures. Why combine signage with a canopy or awning? Visibility: Lighting at eye level and above the door makes your brand readable from the sidewalk and the street, even in winter dusk. Wayfinding: Guests know which door to use, helpful for multi entry campuses and retail centers. Weather protection: Keep customers dry and comfortable while reinforcing your brand at the exact moment of arrival. Clean construction: One coordinated system means fewer penetrations, integrated wiring, and simplified maintenance access. Consistent design: Colors, profiles, and materials match, so the entire entrance reads as one branded element. A business awning is a fixed or retractable shade structure mounted to your building to protect windows or entrances. In commercial use, awnings reduce heat gain and glare, improve comfort, and create space for graphics. When executed in standing seam metal, you get durable, low maintenance performance and a contemporary profile that pairs well with illuminated letters. Materials and lighting choices that last Aluminum framing: Lightweight, rust resistant, and ideal for precise fabrication of both canopies and sign housings. Acrylic faces and push thru letters: Weather resistant and bright with excellent edge definition. Standing seam metal awnings: Long life, strong lines, and great load performance with minimal maintenance. LED lighting: Energy efficient, dimmable, long life, and reliable in cold climates. Properly sealed LED modules and drivers keep your system running through Midwest winters. Permitting basics for awnings and illuminated canopy signs Do you need a permit to put up an awning? In most municipalities, yes. You typically need: A building permit for the canopy or awning structure A sign permit for illuminated graphics, with drawings that show size, location, and lighting details An electrical permit for wiring and connections Local codes also govern projection over sidewalks, mounting height, snow load, wind load, and brightness. A qualified partner will provide stamped drawings when required and coordinate inspections so your project passes on the first try. A realistic design to install timeline Every site is unique, but this is a good planning baseline: Discovery and measurements, 1 week. Site visit, photos, measurements, and discussion of goals. Design and approvals, 2 to 4 weeks. Concept renderings, materials, light levels, and permit ready drawings. City review can add time depending on the season. Fabrication, 4 to 8 weeks. In house metalwork, finish, electrical, and graphics. Winter is ideal for fabrication schedules, shop capacity opens up after the holidays, and you can get ahead of spring installs. Installation, 1 to 3 days. Staging, electrical tie in, and final adjustments. Complex walkways or long canopies may require additional days and off hour work to minimize disruption. Starting design in January helps you hit a late winter or early spring relaunch, with your entrance refreshed before patio season or peak visitor traffic. Photo ready tips for your relaunch Align the fascia: Keep canopy seams and letter placement centered on the entry door for clean symmetry. Choose the right color temperature: 3000K feels warm and hospitality focused, 4000K to 5000K reads bright and crisp for healthcare and retail. Manage reflections: Use matte or low gloss finishes on canopy faces near illuminated letters to keep glare down in photos. Dim for dusk: Add a photocell or programmable dimmer so signage is bright at dusk, then stepped down late at night. Hide the hardware: Integrate raceways, wire chases, and access panels inside the canopy design. Test at night: Do a nighttime punch list before your photographer arrives, check for light leaks, level letters, and consistent brightness. Winter advantages you can use now Cold weather does not stop canopy and sign fabrication. In fact, winter can accelerate your schedule. While permits are in review, your aluminum framing, standing seam panels, and sign cabinets can be built in the shop. You get shorter lead times, easier install dates, and a ready to shine entrance as soon as frost lifts. Bringing it all together, local support matters If you manage a multi site portfolio across Chicagoland, having one team design, build, wire, and install the full system saves you time and coordination headaches. Thatcher Oaks manufactures and installs commercial awnings, canopies, and integrated signage with in house crews, from measurements to final wipe down. For Elmhurst projects, consider exploring an elmhurst commercial canopy sign to see how canopy and lighting packages come together. Planning a corridor or drop off zone, a standing seam walkway canopy elmhurst is a durable solution that keeps guests protected while highlighting your brand. If you are updating an existing storefront, an awning retrofit Hinsdale can refresh your fascia and add efficient LED illumination without a full rebuild. Summary Integrated canopy signage turns your entrance into a clear, protected, and memorable brand moment. You now know what illuminated signs are called, what an internally illuminated sign is, what illuminated signs are made of, and why a business awning is a smart platform for lighting and graphics. With a clear permitting plan, a realistic design to install timeline, and winter fabrication advantages, you can relaunch with confidence and capture great photos on day one. Ready to plan your 2026 facility refresh, reach out to coordinate design, permitting, fabrication, and installation with one accountable team.
December 16, 2025
Midwest winters test every exterior detail on your building. Heavy, wet snow, fast temperature swings, and relentless wind will quickly expose weak points. If you manage facilities for retail, healthcare, schools, or multi-tenant offices, you need entryways, pickup lanes, and walkways to stay clear and safe. Standing seam metal awnings are built for this exact environment, and they outperform fabric options when it matters most. This guide breaks down why, including panel profiles, coatings, snow shedding, load and attachment details, gutter integration, sealing, and real-world life expectancy. You will also find a winter-ready checklist to prevent leaks and ice dams, plus a straightforward look at maintenance and total cost of ownership. Why standing seam wins in winter Durability in freeze thaw cycles: Interlocking vertical seams create a watertight plane that resists wind-driven snow and ice. No fabric stretch, no sag, no moisture intrusion at stitch lines. Snow shedding geometry: Sloped standing seam panels encourage snow to slide off in manageable layers, reducing static load and ice buildup. Structural integrity: Metal awnings are engineered with defined snow and wind loads, using rigid frames and secure wall attachments that handle Midwest storms. So, what is the most durable awning? For year-round commercial use in cold climates, a well designed standing seam metal awning is the most durable awning. It delivers structural strength, weather resistance, and long service life with minimal upkeep. Best metals and finishes for long life What is the best metal to use for outdoor awnings? For most commercial projects, 24 to 22 gauge galvanized or Galvalume steel with a factory baked finish is the workhorse choice because it balances strength, dent resistance, and cost. Aluminum is an excellent alternative for coastal or deicing salt exposure, thanks to its corrosion resistance and lighter weight. Copper and zinc are premium architectural options for signature projects, though they come at higher cost and require specialized detailing. Protective coatings matter as much as the base metal. High performance polyester or PVDF (Kynar) finishes provide exceptional color retention, chalk resistance, and protection against road salt, sleet, and UV. Where pedestrian contact occurs, specify abrasion resistant finishes and consider ice guards to control sliding snow. Panel profiles that shed snow and stop leaks Standing seam panel profiles vary, but for awnings and canopies in snow country, look for: Mechanically seamed or high snap seam heights, typically 1.5 inches or taller, to resist water intrusion. Hidden fasteners to eliminate exposed penetrations in the weather plane. Slopes of 3:12 or greater where possible for better snow shedding. Lower slopes can work, but require careful seam selection and underlayment. Underlayment and flashing are non-negotiable. Self adhering ice and water shield at eaves and wall interfaces, plus continuous cleats and end dams, keep meltwater where it belongs, outside your envelope. Load considerations and attachment that protect your facade Engineering for site specific snow and wind loads is essential. Key practices include: Framing: Welded or bolted steel or aluminum frames sized for the governing load combination, with deflection limits to protect panels and sealants. Anchoring: Attachment to structural substrates, not just veneer. Use through bolts, backup plates, or embeds as required. For masonry, chemical anchors into grout filled cells or structural members are typical. Drift and sliding snow: Evaluate adjacent roof planes. A higher roof can drift snow onto a lower awning. Snow guards or diverters on the upper roof may be needed. Gutter and downspout integration Can you put gutters on a metal awning? Yes. In fact, integrating a continuous gutter with properly sized downspouts is one of the best ways to prevent icicles, splashback, and slippery entries. Use heavy gauge, color matched metal with internal hangers. Direct downspouts to heated drainage paths or snow melt systems when possible, and keep outlets clear of pedestrian routes. Sealing and leak prevention How to seal a metal awning? Start with design, then materials: Use high quality butyl tape at seams and flashings, not generic caulk alone. Select compatible sealants, typically a polyurethane or silyl terminated polymer, and apply to clean, dry surfaces within temperature guidelines. Install end dams at wall flashings, kick outs at terminations, and counterflashing that sheds over the panel plane. Inspect and tighten hidden fasteners after the first season when thermal cycles have occurred. Add a snow guard plan where falling snow could damage gutters or landscaping. Guards should be engineered, not improvised. Life expectancy and maintenance What is the life expectancy of a metal awning? With quality materials and proper installation, standing seam metal awnings routinely last 30 to 50 years. Coatings typically carry 20 to 35 year finish warranties, and frames can outlast multiple finish cycles. Maintenance is light. Plan seasonal inspections to clear gutters, confirm sealant integrity at flashings, and wash away deicing residue. Compare that with fabric awnings that may require periodic re-covering, tension adjustments, or replacement after severe winters. Over a 20 year horizon, the total cost of ownership of standing seam is often lower. Aesthetic options for modern facilities Metal awnings do not have to look industrial. You can choose: Crisp fascia trims and concealed gutters for a clean, monolithic edge. Color matched finishes that complement brand palettes, with optional accent reveals. Integrated lighting for safer entries and wayfinding. Coordinated signage, from dimensional letters to under canopy illumination, to guide visitors for retail, healthcare, and schools. If you are planning an update across multiple sites, explore solutions like an architectural awning elmhurst to align performance and brand presence across locations. Winter ready installation checklist Use this quick list before the first big freeze: Structural attachment: Confirm anchors engage structural framing, and verify torque or pull test results where specified. Slope and snow management: Validate minimum slope, add snow guards where pedestrian or vehicle zones are below, and consider heated mats at downspout discharge points. Flashing and sealing: Continuous cleats, end dams, kick outs, and counterflashing installed in shingle fashion, with butyl tapes and compatible sealants. Underlayment: Ice and water shield at eaves and wall lines, plus slip sheet where needed to avoid abrasion. Gutter integration: Sized for peak melt, with heat trace where icing is common, and downspouts routed away from walkways. Drainage path: Grade and site conditions move water away from doors and into safe runoff zones. Final inspection: Walk the system after the first snowfall to confirm shedding patterns and make small adjustments before deep winter sets in. What to budget What is the average price for an awning? Pricing varies widely by size, projection, structural requirements, coatings, and extras such as lighting or signage. As a very broad guideline, commercial standing seam metal awnings often range from a few thousand dollars for a small entry to tens of thousands for large canopies or continuous walkway coverage. Engineering, permitting, and site conditions influence the final number. A quick site review will provide a more accurate estimate. The bottom line If you want an awning that keeps working when the weather turns, a standing seam metal system is your best bet. You get engineered snow load performance, secure attachment, integrated drainage, low maintenance, and a contemporary look that fits retail, healthcare, and education environments. Thatcher Oaks designs, fabricates, and installs these systems in house for Chicagoland and Northwest Indiana. If you need a local expert for a standing seam metal awning elmhurst project, or you are exploring elmhurst commercial shade solutions for multiple properties, our team is ready to help. Reach out to review your site loads, finishes, and detailing, then head into winter with confidence. Call 630 833 5700 or email info@thatcheroaks.com to get started.
November 10, 2025
When the wind whips off Lake Michigan and your entry door never seems to close, a winter vestibule can feel like a lifesaver. If you run a restaurant, cafe, boutique, or multi-tenant retail space in Chicago or Northwest Indiana, you know the drill. Guests get blasted with cold air, your host stand or checkout area turns into an icebox, and your heating system works overtime. The right vestibule solves all three problems, and if you plan now, you can have it designed, permitted, fabricated, and installed before the holiday rush. In this guide, you will get clear answers on what vestibules are, how they are built, what they cost, how long they take, and what Chicago codes and permits typically require. You will also see how smart branding on panels and door skins can turn a necessity into a curb appeal upgrade with real ROI. What is a vestibule and why add one for winter? A vestibule is a small, enclosed entry space that creates an air buffer between the sidewalk and your interior. You step through an exterior door into the vestibule, then through a second door into the business. That air gap reduces wind infiltration and heat loss, which keeps your front-of-house comfortable and cuts energy waste. For restaurants, that means warmer tables near the door and less HVAC short cycling. For retailers, it means happier shoppers who linger longer. With a professional layout, vestibules are ADA friendly, with clear floor space, smooth thresholds, and proper maneuvering room for mobility devices. Common materials include lightweight aluminum frames and clear vinyl or polycarbonate panels, often paired with swing doors. Hardware is selected for heavy winter use. For permanent systems, insulated panel options and glazing upgrades are available. Temporary vs. permanent vestibules You have two broad choices. Temporary seasonal vestibules: Ideal for November through March. These are modular, code compliant solutions that mount to the facade without invasive construction. Frames are aluminum, panels are clear vinyl or rigid clear sheets, and door options include manual swing doors with closers. They install fast, then store off season. Permanent vestibules: These integrate with your facade for year round use. Options include rigid framing, insulated infill, storefront glazing, and integration with existing canopies or new canopy structures. A permanent vestibule can double as a branded entry feature and improve energy efficiency in both cold and shoulder seasons. Branding can be added to either type. Think printed graphics on clear vinyl panels, door skins with your logo, or a coordinated commercial canopy with illuminated address numbers for better visibility. What do winter vestibules cost? Costs vary by size, complexity, materials, and whether you need permits or landlord approvals. Typical budget bands we see in Chicagoland: Temporary seasonal vestibules for standard storefront doors: roughly 4,500 to 12,000 installed, including measure, fabrication, and installation. Graphics and atypical shapes add cost. Larger multi-door or corner vestibules: 10,000 to 20,000 when custom angles, secondary doors, or wind-load upgrades are required. Permanent vestibules with rigid framing and storefront glazing: 25,000 to 60,000 plus, depending on finishes, lighting, and integration with a canopy. These ranges reflect professional fabrication and in-house installation. Every building and sidewalk is different, so a site measure will confirm clearances, slope, and door swing. Are door vestibules worth it? In most cases, yes. A vestibule reduces infiltration at the busiest door in your building. Chicago winters are long, and each door open event can dump warm air and pull in cold air. Many operators report 10 to 25 percent fewer hot and cold complaints near the entrance and measurable reductions in heating run time. For a busy 2,000 to 4,000 square foot restaurant with high door cycles, a simple seasonal vestibule can often pay back in one to two winters through energy savings and improved guest comfort. When you account for higher winter revenue from seated tables near the door, the ROI improves again. Building code and ADA considerations Local code governs materials, flame spread, egress, and accessibility. In the City of Chicago and many suburbs, you should plan for: Clear egress widths and door swing direction that does not block or reduce the required public way width. Doors must not obstruct the sidewalk when open beyond allowed limits. ADA maneuvering clearances at the interior and exterior approach. Flame resistance for textiles or vinyl panels that meet NFPA standards when required. Visibility strips or decals on clear panels and doors to alert pedestrians. Secure anchoring that protects the facade and can resist wind loads common to winter storms. Permanent vestibules must also comply with building envelope and structural requirements. If you are in a landmark district or special corridor, additional review can apply. Do you need a permit for a vestibule or awning? In Chicago, temporary vestibules installed on the public way generally require a Public Way Use permit, plus drawings and insurance documentation. If you add a canopy or signage, separate permits may apply. Many suburbs require a building permit even for temporary seasonal vestibules, and your landlord will likely require a submittal with drawings, material specs, and an insurance certificate. If you are asking, do i need a permit to put up an awning, the short answer in our region is usually yes, and often you will need both landlord and municipal approvals. A good partner will prepare permit-ready drawings, provide stamped calculations when needed, and coordinate inspections. Lead times and when to start Fall fills up quickly. Here is a practical timeline we see for Chicago and Northwest Indiana: Week 1: Site visit, measure, photographs, and concept layout. Confirm ADA path, sidewalk width, and door swing. Week 2: Proposal, preliminary drawings, and landlord review. If branding is planned, start graphics proofing now. Weeks 3 to 6: Permit submittal and review. Some suburbs turn permits in a week. Chicago public way approvals can take several weeks, so start early. Weeks 4 to 8: Fabrication, including frames, panels, door hardware, and graphics. Installation: One to two days for most temporary vestibules. Permanent vestibules vary based on scope and may stretch to several days with coordinated trades. If you want your vestibule live by Thanksgiving, aim to kick off by early October. Materials, durability, and maintenance Aluminum framing offers strength with low weight. Clear vinyl panels are popular for temporary systems because they install fast and store compactly. For higher traffic entries or longer service life, polycarbonate or acrylic glazing holds clarity and resists scuffs. Door hardware with proper closers and weather sweeps keeps the seal tight. Seasonal maintenance is simple. Wipe panels clean, check fasteners, and store vinyl flat and dry in the spring. Branding opportunities that work Use your vestibule to extend your identity. Add graphics on the approach panel, door skins with your logo, or pair the vestibule with a coordinated commercial canopy. This not only looks polished, it helps guests find the entrance on dark winter evenings. If you plan to integrate signage later, design the frame now with mounting in mind to save time and cost. If you operate west of the city and are exploring seasonal solutions, it may be helpful to review our capabilities around temporary vestibule installations in Hinsdale to see examples of how branding and weather protection can work together. How to budget and plan your ROI Start with a simple worksheet. Estimate your average winter gas consumption, note your door cycles per hour during peak times, and identify the number of seats or retail fixtures within 15 feet of your entrance. A conservative energy savings estimate of 5 to 15 percent for a busy storefront is a reasonable planning number for seasonal vestibules. Add the revenue lift from adding back those formerly chilly seats. Compare the combined benefit to your install cost. Most operators find payback inside two heating seasons. Chicago landlord and property manager requirements Expect to provide drawings that show plan and elevation, overall dimensions, door swing, sidewalk clearances, anchoring method, and material specs. Landlords want assurance that public way access remains clear, that snow removal remains practical, and that the facade is protected. Many leases require a restoration plan, which a reputable fabricator will include. Ready to move from idea to installation? Thatcher Oaks designs, fabricates, and installs entryway vestibule systems across Chicagoland and Northwest Indiana. Our in-house team measures, engineers, permits, and installs, so you get one accountable partner from start to finish. If you are in the western suburbs and want to discuss a custom vestibule in elmhurst, our Elmhurst team can walk you through options and timelines. Summary A winter vestibule is a practical, guest friendly way to cut heat loss and calm the wind at your front door. Temporary systems install quickly and store in spring. Permanent vestibules become part of your architecture and branding. Budget ranges run from about five figures for seasonal units to higher for permanent, and the ROI typically lands within one to two winters thanks to energy savings and reclaimed seating near the entrance. Chicago and nearby suburbs do require permits and landlord approvals, so start early. When you pair a clean, ADA friendly layout with thoughtful graphics, your vestibule works hard for comfort and for curb appeal. If you are ready to plan before the first cold front, we are here to help with design, permitting, fabrication, and installation.